Quantcast
Channel: Outdoor Living – LiveAbode
Viewing all 14 articles
Browse latest View live

Entertaining Outdoors in the Cooler Months

$
0
0

Keep the cooler months entertaining.

All around the country, the autumn months are prime time for outdoor entertaining. Shorter days mean more opportunities for twilight dinner parties and happier happy hours. Cooler temps mean more comfortable conversations near cozy fire pits.

Ready to plan the perfect outdoor party? We’ll show you how.

Get your outdoor space ready.

Set the tone with lighting.

The sun is setting earlier, so keep the ambience going by adding café string lights to your deck.

INSTALLATION TIP:

You can string the lights using an inexpensive 2 x 2 pole and some cup hooks from the hardware store.
LiveAbode Entertaining Outdoors

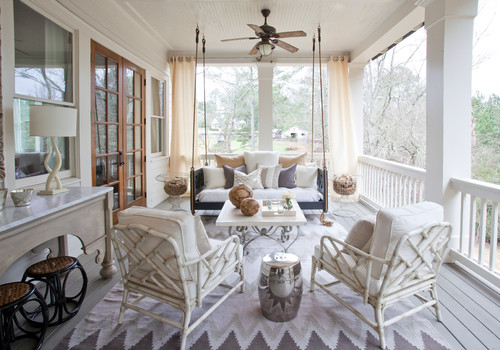
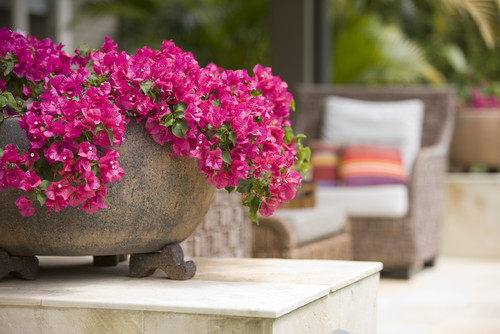
Incorporate the colors of the season.

Revive your deck furniture with dark brown or charcoal gray paint. Complement your new furniture by surrounding it with rich cranberry red, warm brown and zesty orange flowers. Or add new cushions – see our tutorial here on how to make your own– in rich reds or oranges. Either color pairs perfectly with brown or gray. Make the space a destination by adding throw rugs that have flecks of the seasonal colors to tie into the furniture and cushions. As a finishing touch, add pillows in your color palette along with bowls of potpourri and fall flowers – think mums.

LiveAbode Entertaining Outdoors

KEEP WARM TIP:

A basket of fuzzy blankets is the perfect accessory to extend your gathering long after the sun goes down. Your guests will appreciate the gesture once they feel a chill in the air.
LiveAbode Entertaining Outdoors

Set the table.

Create your centerpiece.

Even when you’re short on time, you can still create a festive focal point with a simple table runner and a pile of pumpkins.

  • For your table runner, pick up a piece of burlap from your local craft store. Make sure it hangs evenly 6–12 inches off each side of your table.
  • Then, pick up a batch of tiny pumpkins from your local garden or seed shop. Or find artificial ones at your local home improvement or hobby store. Once your runner is in place, arrange your pumpkins on top of it.

LiveAbode Entertaining Outdoors

Create your own pumpkin succulent.

Here’s another centerpiece idea if you’re more of a DIY-er.

What you’ll need:

  • Small pumpkins
  • Spray adhesive
  • Glue gun
  • Moss
  • Variety of succulent plants

How you’ll do it:

  • Cover the moss with an even layer of spray adhesive.
  • Place moss on top of the pumpkin, pressing down firmly for a few seconds.
  • Repeat until all pumpkins are covered.
  • Using a glue gun, add the succulents to your pumpkins one by one.


Build your go-to menu.

We call these “go-to’s” because they always please. They use flavors that match the season and they’re simple to prepare.

Apple Cider Mimosas

Apple cider mimosas are sweet, tart and refreshing—and always a fall favorite. Here’s how to make them.

Ingredients:

  • Apple cider
  • Champagne
  • Apple slices for garnish
  • Caramel sauce

Instructions:

  • Dip your champagne glasses into the caramel sauce to coat the rims
  • Fill each glass about half to three-quarters full with apple cider
  • Top with champagne
  • Practice saying “Cheers!”

LiveAbode Entertaining Outdoors

Pot Roast

Whether you’re cooking for your family, friends, or the entire block, this is hands down the perfect fall dish.

French Onion Soup

Deep-down warm and flavorful, there’s a reason this dish is so popular. Here’s a great way to make it.

HOT TIP:

Use a microwaveable hot plate to keep your food at serving temperature for up to an hour. Or serve dishes from a crockpot set to “low.”

PLAN B TIP:

Have an indoor backup plan in case of inclement weather. If it’s just a drizzle and wind is not an issue, open up a cabana.
LiveAbode Entertaining Outdoors

The post Entertaining Outdoors in the Cooler Months appeared first on LiveAbode.


Give Your Outdoor Rooms a Cozy Winter Makeover

$
0
0

While it’s certainly true that in some regions sitting on the patio in midwinter is not realistic, for those who live in mild climates there’s no reason outdoor rooms must sit unused for several months. To tempt yourself onto the porch or patio, even when there’s a nip in the air, give your outdoor rooms a wintery makeover that boosts warmth and coziness.

Insulate with Rugs and Curtains.

On a covered porch, adding an indoor-outdoor rug and thick outdoor curtains can help keep drafts at bay and provides a base layer of textiles to tempt you outdoors. Neutral colors for more permanent pieces look appropriate year-round and can be spiced up come spring with fresh pillows.

dreamy back porch

Pile on the Pillows.

The more, the warmer! Pillows not only look cozy; they make outdoor benches more comfortable and keep you warmer by cuddling you while you sit. For the cooler months, choose pillows in warm neutrals, like cream, cocoa and gold, in a rich range of textures. If your seating area is exposed to the elements, keep a storage bench nearby and stow pillows there between uses.

dreamy back porch

Make Seats Toasty Warm.

To make an outdoor dining area more inviting in cool weather, store a pile of soft and fluffy fake sheepskins indoors, and drape them over seats when you’re ready to sit down. If your chairs have cushions, consider keeping them indoors (even if your dining area is covered) so they stay warm until you’re ready to use them.

dreamy back porch

Nestle Up To A Wall.

If you would like to use your patio more often in winter, it helps to use a wall as a windbreak. Pull seating close to the side of your house or nestle it next to a garden wall to gain protection from the wind.

Light A Fire.

Consider adding an outdoor fireplace — the appeal of gathering around a warm blaze on a winter evening is undeniable. And it doesn’t need to be built in; a simple fire bowl can work just as well.

dreamy back porch

Keep Extra Blankets On Hand.

Neatly folded throws placed over the back of each chair look welcoming and make it easy to wrap up when you feel a chill. Store extra blankets rolled up in a basket near the door, and a warming throw will never be too far away.

Grow A Windbreak.

While this isn’t something that can be accomplished in a single season, if you are willing to wait, growing a living wind barrier is both effective and ecofriendly. Speak with someone at a local nursery to find out which vines or shrubs will work well in your area and stay green throughout the winter.

Garden Design Crystal Palace, South London 6

Roll Down The Shades.

On a covered porch, adding simple shades that can be pulled all the way down provides some buffer from the wind. Just be sure to tie them down at the bottom, or they will flap all over the place at the first breeze.

Three Season Porch

Photo by Design Elements – More eclectic porch photos

Make the Lighting Magical.

During the shorter days of winter, more light is always welcome — and a well-lit patio or porch is so much more inviting. If you have a pergola or another overhead structure, twining strands of white lights through it is a wonderful way to bring your outdoor space to life at night.

Country French Courtyard


Houzz Related Links:

The post Give Your Outdoor Rooms a Cozy Winter Makeover appeared first on LiveAbode.

4 Reasons to Celebrate Your Garden in Winter

$
0
0

For many, winter is a period to slog through and a necessary evil — snow interferes with our travel plans, while windy days send chills deep into our bones. And yet, winter is a miracle. Without it, a lot of our plants and wildlife simply wouldn’t thrive. Here are four reasons to praise winter.

1. Plants need the rest.

Let’s use herbaceous perennials as an example — grasses, sedges and flowering plants that die back to the ground each fall and come up again in spring. After spending a lot of energy making flowers to attract pollinators and to develop seeds, these plants focus even more energy into root growth in the fall. Over winter, they enter a welcome period of quiescence, resting until they’re ready to leap out of the ground the second warm temperatures return.

It’s important to choose plants adapted and native to your region, since perennials used to periods of rest in their native environment might be forced to keep growing and blooming if planted in a different climate. Woody plants like trees and shrubs require a certain number of chill hours to clue them in that spring has returned. Chill hours are the number of hours over winter spent between 32 and 45 degrees Fahrenheit (0 to 7.2 degrees Celsius) and are based on how far north you are.

Landscapes


2. Snow is a miracle worker.

I grew up in Minnesota with a gardening mother who watched the weather every day, and I quickly learned the benefits of snow for insulating plants. In winters with adequate snow cover, plant loss was almost nonexistent, whereas dry winters resulted in extra work in the spring garden.

Snow, with its air pockets between flakes, is a wonderful heat and sound insulator. In the spring, melting snow will hydrate the soil as it thaws, also filling creeks and ponds to support a diversity of wildlife in aquatic and riparian ecosystems.

Glencoe Residence Winter 4


3. Seeds love the snow.

Lots of seeds need a period of cold, moist stratification in order to germinate in the spring — some require a week, some several months and others need a year or two. Being buried under snow is the ideal condition for a seed that needs stratification.

Let some of your plants go to seed, since this shows what conditions they like and how they prefer to grow. I have specific plants that I let fill in the gaps and others that I use to prepare the area for slower-to-establish perennials.

Winter is also a great time to become your own plant nursery. Start seed beds and seeded pots using local, open-pollinated, genetically diverse plants to help create more robust and resilient ecosystems.

Winter Sedum


4. The wildlife is using the garden in unseen ways.

Your garden is still very much alive. Birds hide from predators and take shelter from the elements in dense plant cover created by leaving grasses and perennials standing over winter and by designing with diverse plant structure, including shrubs and small trees. Additionally, leaves from last fall and a healthy dose of snow provide a snuggly blanket for overwintering moth and butterfly larvae, adult butterflies, bee adults and larvae, beetles, spiders, amphibians and more.

Floating Cardinal.JPG


Houzz Related Links:

The post 4 Reasons to Celebrate Your Garden in Winter appeared first on LiveAbode.

Spring Gardens Are Waking — Here’s What to Do in March

$
0
0

Clean your pruners and get out your gardening gloves. Spring is here, bringing longer days, fresh blooms and annual garden chores. In the Pacific Northwest and Southwest, it’s time to prune trees. Early bulbs and wildflowers are peeking their heads above the soil around the Northeast and Great Lakes regions. Start your herbs and vegetables in Texas, and don’t forget about companion plants. While you’re at it, try something new in the garden — native or exotic — and remember your local wildlife. Here’s what to do in March in the U.S., region by region.

Northwest

“I’m not sure if I love the apple blossoms or the actual apples more,” says landscape designer Karen Chapman, “but I do know that without proper pruning, the trees will not be as vigorous nor produce as much fruit as they could. This is the last month to prune fruit trees, so sharpen those pruners.”

Get her Pacific Northwest March checklist

California

Plant bougainvillea in a pot now and you can have a showy display by midsummer,” writes California garden editor Bill Marken. “It’s best to choose one of the compact varieties, such as ‘Singapore Pink’, ‘Temple Fire’ or ‘Purple Queen’. When planting, take special care not to break up the root ball — plants are sensitive about this.”

Get his California March checklist

Southwest

“Do you love citrus?” asks Arizona horticulturist Noelle Johnson. “March is the best time of year to add a new citrus tree to the garden. Any pruning that your citrus needs should also be done this month.”

Get her Southwest March checklist

Rocky Mountains

“While planning your vegetable garden, try to incorporate companion plants for improved plant health,” suggests Colorado landscape designer Jocelyn H. Chilvers. “Good partners for a include members of the onion family, carrots, parsley, cucumbers, nasturtiums and marigolds.”

Get her Rocky Mountains March checklist

Texas

“Get your veggies and herbs in the ground for months of harvest,” says landscape designer Jenny Peterson. “Chard, collards, cucumbers, eggplant, pumpkins, summer squash, tomatoes, tomatillos and endive will transplant well this month — look for healthy (free of pests and diseases) 4-inch pots at your local nursery. Herbs like artemesia, chives, lemongrass, mint, oregano, rosemary, sage, sorrel, thyme and santolina can also be planted. Remember that mint tends to aggressively take over a garden, so consider planting it while it’s still in its plastic nursery pot to keep its roots from spreading too much.”

Get her Texas March checklist

Central Plains

“While you’re thinking about plugging holes in the garden vista with ornamental native grasses, think about adding some architectural features that are also beneficial to wildlife,” writes Nebraska garden consultant Benjamin Vogt.

Get his Central Plains March checklist

Great Lakes

“Usually by the end of March, the first of the native wildflowers, sharp-leaved hepatica (Hepatica nobilis var. acuta), begins blooming,” writes garden coach Barbara Pintozzi. “It is slightly earlier than round-leaved hepatica (Hepatica nobilis var. obtusa). Both are semievergreen and might benefit from a bit of dead-leafing before blooming.”

Get her Great Lakes March checklist

Northeast

“Look for early bulbs,” writes landscape designer Charlotte Albers. “They can be hard to see if they’re scattered over a big area, but they make a big impact after months of color deprivation. Shown here is reticulated iris (Iris reticulata), one of the very earliest ephemeral bulbs to appear through the leaf duff and debris of late winter.”

Get her Northeast March checklist

Mid-Atlantic

“While hunting for new growth, don’t forget to look for seeds,” advises Amy Renea. “Many plants still have seedpods hanging on for dear life, and you can often harvest seeds to plant immediately.”

Get her Mid-Atlantic March checklist

Southeast

“If you have always wanted to plant a clematis at your mailbox, now is a good time to plant one, but only if you have a sunny location that does not receive the hot afternoon sun,” suggests garden writer Helen Yoest. “Clematis needs good soil and good drainage. Mulch around the plant to keeps the roots cool.”

Get her Southeast March checklist

The post Spring Gardens Are Waking — Here’s What to Do in March appeared first on LiveAbode.

Designing an Outdoor Kitchen

$
0
0

Outdoor kitchens have become increasingly popular over the years and we don’t see that changing any time soon. Whether you’re installing a new outdoor kitchen or giving it an update, consider these trends and tips to best enhance the design and functionality of your space.

Trends to Watch

This year’s outdoor kitchen trends feature high-quality, specialized appliances that offer maximum functionality.

  • Grills: Accommodate your cooking style with multiple grills if that suites you best. Grills range from Kamado style, hibachi style, natural gas, propane and dual-fuel options.
  • Refrigerators & Ice makers: If you plan to use your space for entertaining you’ll want these essential conveniences.
  • Dishwashers: Add a dishwasher or sink to ensure you never have to leave a party early to clean up!

LiveAbode - DesignBuilders_outdoor kitchens_3

Outdoor Kitchen Essentials

Incorporate the following design elements to create a stylish, functional area where you can match whatever culinary feats you achieve indoors to the outside.

  • Cabinetry: Durable, high-quality cabinets, such as those from Danver Stainless Outdoor Kitchens or Brown Jordan Outdoor Kitchens, provide functional storage as well as beauty. Select from a variety of door styles in raw stainless steel or custom powder coating for color.
  • Waste disposal system: Trash pulls integrated into your cabinetry provide convenience and ensure pests and pets don’t knock over or get in your garbage. These integrated systems are also the most design minded because they disappear entirely for a seamless, sleek look.
  • Entertainment: By integrating islands, bars, televisions or sound systems, outdoor kitchens become more than a food-prep area; they become places to entertain, relax and enjoy time with friends and family.

LiveAbode - DesignBuilders_outdoor kitchens_2

Layout Considerations

Make your outdoor kitchen space functional, beautiful and accessible year-round with these smart layout choices.

  • Be strategic about heaters: When the weather turns colder, construct a privacy wall to block the wind and then install a heater system like those featured here.
  • Maximize space: To make the most of your space, add plenty of counter space and consider dual-function areas, such as islands, where people can come together to prepare meals.
  • Don’t forget lighting: Make sure your whole kitchen has adequate exterior lighting for food-prep safety and ambiance. You’ll also need it when it gets dark earlier in the winter.LiveAbode - DesignBuilders_outdoor kitchens_1

Post written by Design Builders, Inc., a home improvement contractor in the Washington, D.C. metro area.

The post Designing an Outdoor Kitchen appeared first on LiveAbode.

13 Subtle Ways to Add Privacy to Your Yard

$
0
0

Let’s face it: Even though we love our neighbors, we all occasionally want to step outside without having to strike up a conversation. Although fences and brick walls can do the trick, adding an extra divider, screen or plant barrier can block your neighbor’s two-story view for good.

To create your secret retreat, freestanding privacy screens, wood slat partitions and partially enclosed pergolas are effective (and nice to look at). Plants are also a great choice. Landscape architect Bruce Clodfelter often uses holly, evergreen and Ligustrum for a more natural partition, while garden designer Stephanie Bartron frequently goes with a bamboo or hedge barrier. For something a little more decorative, both architects recommend a trellis or arbor; Bartron frequently uses climbing vines, espalier shrubs and grapevines for added cover, while Clodfelter added Confederate Jasmine, Baltic Ivy and kiwifruit to his own personal patio.

Regardless of your materials, both Bartron and Clodfelter agree that placement is key. “Your first instinct is to put up a hard wall right on your property line, but sometimes that isn’t the best space for it,” Clodfelter says. “It’s better to place those screening devices closer to your house; it’s counterintuitive, but it makes your backyard look bigger.”

As you consider how best to solve your own backyard privacy dilemma, try using one (or many) of these creative solutions.

Raise some artistic decorative panels. Privacy screens don’t need to be boring. These custom pieces block the neighbor’s view and act as an interesting outdoor focal point.

Think about the view from above. If you live in the city, an arched trellis will ensure that no neighbors — not even those towering over you — can see what’s going on.

Create seclusion with a wood slat wall. With a partition added to an already-there concrete wall, this small deck now offers plenty of privacy.

Keep it private with curtains. For a more secluded setting, add outdoor curtains to your pergola. They’re easy to move when not in use and can help add to your outdoor decor.

Screen in your hot tub. Ensure your spa isn’t out in the open by installing these corrugated acrylic panels. You can even filter light from behind for a romantic background glow.

Go vertical with your flowers. To block the view of two-story neighbors, landscape architect Bartron bolted this tall custom metal trellis onto the garage wall. She added colorful Orange Clock Vine for additional privacy.

Think about an outdoor fireplace. Flanked by arborvitae trees, a tall fireplace effectively hides this fun entertainment space from sight.

Decorate your space with a living wall. Give a tall fence new meaning by creating your own vertical garden. It adds even more privacy, and does it with style.

Don’t block off your entire view. Landscape architect Clodfelter is all about privacy, but he likes to open up small windows between his property and his neighbors’ for the occasional “borrowed view.” Here in his own garden, he used jasmine and ivy to create a partial partition but left the middle of the trellis wide open.

Create a potted plant border. For an inexpensive apartment solution, try adding medium-height potted plants along the balcony railing.

Stray from the ordinary. If you have to have a fence or wall, try going with a unique material. This bamboo adds interest to a retaining wall and helps enhance the yard’s Asian feel.

Raise those planters. Add more vertical cover (and much-needed color) by securing planters on top of a low concrete or brick wall.

Invest in a covered patio. Although it might be more of a splurge, a pergola like this one paired with a perfectly positioned fireplace wall conveniently blocks neighbors from seeing your dinner party.

Related Topics: 

The post 13 Subtle Ways to Add Privacy to Your Yard appeared first on LiveAbode.

Add Life to Your Outdoor Space: the DIY Flower Box

$
0
0

Make your exterior pop with color and curb appeal.

Flower boxes bursting with colorful potted perennials and small flower-producing shrubs are a great addition to your exterior space. Sure, you could spend up to $100 for a ready-made flower box. Or you could experience the priceless satisfaction of building your own.

Here’s how to accomplish the latter using PVC trim from Royal® Building Products. It’s as easy to work with as wood, and there’s no need to paint it. Plus, it’s low-maintenance and weather- and bug-resistant, making it a perfect material for outdoor projects. You can find it in home improvement stores like Lowe’s® and The Home Depot®.

Here is what you need.

  • PVC board 1” width
  • Table saw
  • Safety goggles
  • 20 trim screws 2”
  • Electric screwdriver
  • Potting soil
  • Potted flowers
  • Gardening shovel
  • Pencil
  • Tape measure
  • PVC plugs

Step One

Gather, measure and cut your PVC trimboards with a circular table saw. Follow these dimensions:

  • Base (8×22 ½”)
  • Short Sides A (2) 8×7 ¼”
  • Long Sides B (2) 8×24”
  • Top C (2): 2×7 3/8”
  • Top D (2): 2×26”

LiveAbode_ DIY Flower box_Step1

Step Two

Assemble the sides to the base, starting with the short sides. Lay the base on a flat surface and use four 2” screws to connect short sides A (8×7 ¼”) to the shorter sides of the base. Then use five 2” screws to join long sides B (8×24”) to the long sides of the base (one per corner and in the middle).

LiveAbode_ DIY Flower box_Step_2

Step Three

Create the borders along the top of the planter. Use three to four 2” screws to connect the long tops to the long sides and two 2” screws to join the short tops to the short sides. Place the screws .5 – 1” in from the ends and in the center of the top pieces.

LiveAbode_ DIY Flower box_Step_3

Step Four

Cover holes with PVC plugs.

LiveAbode_ DIY Flower box_Step_5

Step Five

Drill three holes into base to allow for soil drainage and air circulation around roots.

LiveAbode_ DIY Flower box_Step_6

Step Six

Add planting soil and flowers. Fill with perennials and flowering foliage. Yellow, purple, red and white make a great color combination.

LiveAbode_ DIY Flower box_Step_7

Creating your own flower box only takes an hour or two. The best part? It will last season after season.

LiveAbode_ DIY Flower box_Step-8


The post Add Life to Your Outdoor Space: the DIY Flower Box appeared first on LiveAbode.

Seek Shelter in the Shade This Summer

$
0
0

Maximize your outdoor time this summer by incorporating shade into your garden. Not only does shade make an outdoor space more comfortable, it also protects from the sun’s harsh rays. Designing for shade also incorporates an often overlooked element of landscape design: the ceiling plane. No matter how solid, transparent, large or small, a ceiling plane helps to create a sense of enclosure, intimacy and privacy. Here are eight ways to add shade to your garden this summer.

1. Put up an umbrella. If you’re looking for ease and affordability, adding an umbrella to your garden or patio is a no-brainer. Their portability and the variety of styles and colors means you can’t go wrong. From mini umbrellas for patios and balconies to retro-style umbrellas that will bring back memories of summer days spent at the amusement park, your options for personalization are endless.

Try choosing a color that sets the tone. In this Portland, Oregon, backyard, a fresh green umbrella adds to the yard’s lush view. Cobalt blue cushions and metal patio furniture contrast with the mostly green scene.

Patio furniture: Ethan Allen

See how to pick a patio umbrella that performs

2. Hang a shade sail. A shade sail, made of moisture-resistant fabric, is another great way to create temporary shade for your patio. A shade cloth can be easily attached and removed from a free-standing post set in concrete or metal hooks mounted to the side of a structure.

Try overlapping multiple sails in different colors for a lively look. This sheltered patio sets the stage for hours of outdoor lounging.

See how shade sails help outdoor rooms take flight

3. String up a canvas shade. Is there anything dreamier in an outdoor space than soft, diffused light shining through gently billowing fabric? Attach outdoor fabric to overhead wires so it can easily be retracted on a pulley, or run it through the frame of an existing pergola. When the weather changes, just fold up the fabric and store it in a drawer until next summer. You can even choose a material other than fabric, such as bamboo or shade cloth, for a different feel.

See patio makeover with a new retractable shade structure

4. Erect a temporary canopy. Having a party? A canopy is a great way to add shade in a pinch. It also helps to create an intimate feel; your guests will want to sit, sip and chat for hours.

5. Grow vines over a pergola. There’s nothing quite like the magic of vines growing overhead, whether your aesthetic is classic or contemporary.

There are hundreds of vines to choose from, depending on your yard’s growing conditions. Evergreen clematis (Clematis armandii) has attractive, shiny, deep-green leaves throughout the year and fragrant, white, star-shaped flowers in spring. A deciduous vine, which loses its leaves in fall and winter, allows precious sunlight to stream in when you want it most.

Some vines, though gorgeous when in bloom, can turn into garden thugs if not properly maintained and given a sturdy structure to grow on. Wisteria (Wisteria floribunda) most famously falls into this category. Its trunks become thick and aggressive over time, easily tearing down roof gutters and deck railings. Go for it if you have a free-standing, sturdy structure — few plants rival its beauty.

See more guides to growing fruiting and flowering vines

6. Don’t be blind to the vertical. It’s getting late in the day, the sun is dipping and suddenly the sun’s rays stream horizontally under your overhead shade structure straight into your eyes. What do you do? Try adding a vertical element to your shade setup. Attach a curtain rod to your pergola and hang outdoor curtains that can easily be drawn for shade and privacy. Built-in retractable shade screens can be quickly lowered for temporary shade.

This Hawaiian lanai features ikat curtains from Urban Outfitters, tied back with nautical rope and a compass. Soft textiles and yard sale knickknacks create a whimsical, bohemian lounge.

See more of this boho beach house in Maui

7. Blend structures. For a more modern approach, you can make your fence work triple time by rounding and extending the top overhead. To soften the look, plant vines at the base that can wind their way up and over.

Ipe wood surrounds this intimate Manhattan rooftop. The wood slats climb up a steel structure that offers shade and privacy from surrounding buildings.

8. Create shadow play with a metal screen. Try mounting a laser-cut metal screen to an overhead structure. An enchanting play between light and shadow results.

Your turn: How do you create shade in your yard? Upload your photos in the Comments.

Related Topics:

6 Patio Cover Types to Shade You in Style

Choose From Thousands of Curtain Rods to Hang Outdoor Curtains

The post Seek Shelter in the Shade This Summer appeared first on LiveAbode.


Tricks of the Shade – Designing a Pergola

$
0
0

Outdoor spaces have become extremely popular design projects, but if the sun is blazing a shade structure or pergola can make the space more usable. The following trends and tips cover everything you need to know about pergola design.

Design Tips

Design for longevity

Worry-free and low maintenance are key factors in pergola design. Heavy-gauge extruded aluminum is the preferred material for a shade structure with minimal maintenance and maximum longevity. Powder-coated paint eliminates concerns for rust or deterioration, and most pergola companies offer a variety of regular and custom colors.

If you choose to use treated lumber, keep in mind that it will require regular maintenance and refinishing/painting every three to four years. Wood pergolas are also susceptible to climate conditions and have sun protection limitations.

Angle of the Sun

Monitor the sun throughout the day and in different seasons to determine where the sun hits. Remember that a shade structure overhead does not necessarily have an effect on the early morning or late afternoon sun, but adding side-shade elements to your pergola, such as curtains or a decorative header, can provide full sun protection.

Design Trends and Styles

Adjustable smart pergolas

Pergolas have gone high tech in both form and function. For instance, with the touch of a smart phone some pivoting pergolas can adjust up to 180 degrees, a rain sensor can be triggered for waterproof coverage and louvers can be opened when wind speed increases as a safety precaution.

Topless or sliding sun roof

“Today’s homeowners are looking to reduce sun exposure, but they also want flexibility in the amount of sun that reaches their outdoor spaces,” explains Scott Selzer, CEO and President of Arcadia Building Products.

One design option to address this need is a pergola that transforms from fully open to closed and covered. One way to achieve this is by utilizing a removable shade or taking it up a notch with the Slide, from Arcadia Building Products. Inspired by the Tesla sunroof, it automatically opens to reveal the sun with the option of full sun protection via the pivoting louvers when closed.   

Traditional versus modern

You should always consider a design that compliments the existing architecture of your home. Pergolas can emulate traditional, Victorian or ultra-modern styles. To blend a modern with traditional style, consider using cornices in your design.

To screen or not to screen

Pergolas and shade structures can be enclosed with screens for protection from the elements, which includes pesky bugs. Even more versatility is offered with on-demand retractable screens. Heating elements incorporated into the design also means extended use of the space in most climates.

If you are not sure what type of shade structure you want, check out this article that explains the differences between pergolas, arbors and patio covers.

Post and photos by Arcadia Building Products, a manufacturer of adjustable louvered pergolas.  

The post Tricks of the Shade – Designing a Pergola appeared first on LiveAbode.

8 Inviting Outdoor Dining Rooms

$
0
0

You don’t need much space or fancy patio furniture to turn an outdoor area into an inviting spot for enjoying a meal outside. A few chairs drawn up around a cafe table under a shade tree, or benches and a folding table on a roof terrace, are all it takes to create an alluring destination. Let’s take a look at 8 inspiring dining table and seat combinations for making the most of dining under the sky.

1. Carefree retreat. Pair retro industrial metal chairs with an all-purpose metal-topped table for an outdoor dining setup that not only looks stylish but is weatherproof and easy to clean too. While we most often think of industrial-style furnishings in contemporary backyards, they can work just as well in more traditional landscapes, adding structural balance to loose, easygoing plantings and colorful flowers.

2. Meadow hideaway. If your outdoor table is positioned in a standout garden setting, keep all attention on the beauty of the landscape with an understated outdoor dining setup. For example, in this backyard in upstate New York, simple low-backed metal chairs and a sleek outdoor table nearly disappear from view among a stunning meadow planting of billowing ornamental grasses and flowering perennials.

3. French-style courtyard. Outdoor dining furniture, with the help of a few other elements, can be an opportunity to define the style of your garden or patio. For a romantic French-style terrace, for example, look for metal bistro chairs and antique outdoor tables to set the mood. Further the style with accents like traditional terra-cotta pots, trimmed boxwood globes, a stone fountain, metal lanterns and potted Mediterranean herbs.

4. Backyard barbecue. If you’re adding a new outdoor dining setup to your backyard but can’t decide where you’d like to put it, think about where guests naturally congregated at your last backyard bash. Were they drawn to a sunny spot at the back of the yard, or did they end up clustered around the outdoor grill? Chances are, the best place for your outdoor table is close to the house and right up where the action is. For example, in this Austin, Texas, backyard, the dining table is close to the grill — perfect for passing a kebab straight from the fire to the plate.

5. Vine-covered patio. Enjoy dining or relaxing outdoors under the leafy boughs of evergreen vines and fragrant climbers. In this London backyard, the designer used a series of trellises, topped with fragrant wisteria and white-flowering climbing roses, to cast shade over an outdoor dining table.

When choosing vines to plant over a trellis, consider whether you’d like them to provide shade, fragrance, color, fruit or all four to enhance your outdoor dining area. A few top choices include clematis, climbing roses, grapevines, chocolate vine (Akebia quinata,USDA zones 5 to 9; find your zone), honeysuckle (Lonicera sp.), wisteria and potato vine (Solanum crispum).

The table and chair combination in this backyard also cleverly increases flexibility. Set in the corner by the L-shaped built-in benches, the wooden table feels pleasantly tucked at the back of the stone patio, perfect for a dinner party of six. Pulled out to occupy the center of the patio, the table (plus more chairs) could seat eight people, with the option to seat more on the bench seats.

6. Rustic terrace. To give a small-scale outdoor eating area a dose of woodland charm, swap folding chairs for tree stump stools. If you’re making your own (or asking for them from a local tree removal company), keep in mind that for comfortable seating, you’ll want a stump that’s 17 to 19 inches tall with a cut at the bottom to prevent wobbling.

7. Corner booth. Just like the coveted dining spot in your favorite restaurant, a garden booth can increase intimacy and a sense of seclusion while you’re dining outside. In this London backyard, a booth constructed of a brick base, raised deck flooring, slatted wood seat backs that double as privacy screens and wooden bench seating form a private corner nook for hosting dinner. A couple of seat cushions and throw pillows would make the space even more inviting.

8. Lofty perch. More so than furniture in other outdoor areas, tables and chairs on the rooftop really take a beating. Choose materials like treated metal and heavyweight teak that can withstand prolonged exposure to sun and moisture — or pick lightweight, collapsible furniture that’s easy to move.

This sunny rooftop terrace in London relies on a combination of both. The metal-and-wood table and benches can hold up well to weather without warping or otherwise showing damage. The colorful slingback lounge chairs are more fragile but are easy to move inside over the winter.

Related Articles:
Buy Enough Industrial Metal Chairs Here For Your Next Party
Try an Outdoor Fountain For a French Style Courtyard
Locate Award-Winning Deck Builders Near You

The post 8 Inviting Outdoor Dining Rooms appeared first on LiveAbode.

5 Ways to Take the Dull Out of Your Outdoor Furniture

$
0
0

When it comes to absorbing the punishing effects of summer sun, wind, rain storms and pool parties, your outdoor furniture bears as much of the brunt as your home’s other exterior elements. Even furniture touted as “weatherproof” needs its share of care. Follow these on a regular basis, and you’ll have no trouble bringing the “new” back into your cushions, furniture and even your deck.

Hosting an outdoor party soon? Get ready to kick off the perfect party after following the decorating and menu tips in this article.

The post 5 Ways to Take the Dull Out of Your Outdoor Furniture appeared first on LiveAbode.

How to Transform Your Unused Carport Into an Outdoor Dining Room

$
0
0

When your house gives you square-footage-challenged lemons, you make square-footage lemonade … or in my case, lemon-wheel-garnished sangria. Each spring, as the weather changes from dreadful to dreamy, I come to realize how my dining room only accommodates two to three people max. Knowing that three is a crowd and that crowds, once armed with adult beverages, often result in broken glass, damaged feelings and/or stained furniture, I was not about to host a springtastic cocktail party anywhere near my grasscloth-covered walls. Determined to take the party outside, I put my own carport to the test to see if I could transform it into a temporary dining space on a budget. Along with my carpenter-friend, Brian, and my designer-slash-assistant-slash-friend, Aprill, here’s a few simple, cost-effective ways we outfitted a covered parking space for both park and recreation. And, yes, Aprill is spelled with two Ls.

It’s hard to believe this space has been catching oil leaks and taking a beating from muddy tires. But with the introduction of pattern, color and lightweight furniture, it completely takes on new identity as a place to throw back red sangria — and, thanks to my over-propping, a gigantic plate of enormous strawberries.

Step 1: To erase any sign that your new, albeit temporary, dining space is simply a waiting room for your trusted automobile, it’s best to start from the ground up. Pick up three gallons of garage floor paint in contrasting colors to create a graphic pattern which will result in a dining-room-rug-like appearance. I suggest stripes since they’re simple and quick to create.

After washing the surface with a hose and letting it air dry, paint the entire surface a solid base color using a roller on an extender pole. Once the base color is dry to the touch, use painters’ tape to mark your pattern. Paint your first accent color between the proper pieces of tape. Once the first accent color is completely dry, reposition the tape as necessary, then paint your final accent color. Wait at least 4 hours before walking on the newly painted space.

Step 2: Choosing proper seating is key to keeping your guests happy. If you couldn’t care less about your guests’ comfort level, perhaps you need to rethink exactly what kind of friend you are … ha! Hit up flea markets, thrift stores or garage sales for sturdy, lightweight chairs made of metal or plastic. Pay no attention to the finish on the frame or the cushion; those are simple things to change.

Step 3: Lightly sand the existing finish of your secondhand chairs with a sanding block. To transform them on the cheap, add a coat of spray primer, then a finish coat of high-gloss spray paint with a spray handle attachment. Or drop the chairs off at a local auto body shop for a super thick, extra durable car-like finish with a much heftier price tag.

To give the cushions new life, remove the existing cushion with a screwdriver, tear off the old fabric, then use a staple gun to attach the new fabric. For a more tailored look, drop the cushions off at a local upholsterer who can add welt cord for a touch of contrast.

Step 4: Privacy is important to keep those nosy neighbors from listening in on conversations and peeking in on shenanigans. No walls? No problem! Simply repurpose galvanized metal conduit as drapery hardware by attaching the conduit to outdoor walls or beams using plumbing flanges and metal screws.

Note: You’ll need clip rings in order to quickly put up and take down outdoor draperies panels. Make sure you slide your clip rings onto the poles before attaching poles to flanges.

Step 5: Once the poles and flanges are in place, attach your drapery panels to each clip ring. Keep in mind you’ll need an average of 7 clip rings per panel. See how Aprill is smiling as she hangs the panels? It’s probably because of that extra L in her name.
Step 6: To give your outdoor drapery panels a more tailored look, it’s all about the fold. Once the panels are all attached, run your fingers Chinese-finger-cuff-style through the back and front of the fabric, then create a fold from the top all the way to the bottom. By the time you do this, they’ll look as though they were professionally sewn.
Step 7: As far as choosing outdoor tables go, worry more about the sturdy base than the top. If you find a great base but no top, simply have a piece of pressure-treated plywood cut to size, attach it to the base with screws, then conceal it with a tablecloth.
Step 8: If you’re good with a sewing machine, consider adding designer detail to a readymade tablecloth with a solid border around the edges. This adds graphic impact and takes away the I-ran-to-the-store-and-bought-this-last-minute-ness of it all. For those who can’t operate a sewing machine, consider adding the trim using a roll of iron-on adhesive tape and an iron.
Step 9: Every great dining room has a great light fixture above. To ground your temporary outdoor dining space without having to deal with electricity or major costs, stick with paper lanterns in contrasting colors; they’ll kinda double as art. As far as hanging them goes, all you’ll need are some hook eyes and string. Take them one step further by adding battery operated tea lights inside instead of true candles. Last, notice the handsome carpenter dude in the photo? Yep, that’s Brian. He really hates me right about now for publishing this on the Interwebs.
Step 10: Every designer-caliber room needs a great piece of art, even if it’s outside. To hang a piece of art as a focal point, simply use a masonry nail and a hammer into the home’s exterior.
Step 11: Since your neighbors will think you’re nuts if you keep a sideboard on your carport 24/7, simply add casters to an indoor dresser, then wheel it outside when you need a serving station.
Step 12: The last step is to set the table. It may sound obvious, but flowers are that finishing touch that really pulls it all together. To make supermarket flowers work, simply buy a few bunches of the same species in different colors, remove the filler, then place them in a vase. If your friends ask where you got the impressive bouquet, tell them “from the most expensive florist in town.”
Step 13: At the end of a long day, sit back and enjoy all your hardwork. And if those pesky neighbors try to get all up in your business, simply draw back those drapery panels and fuggedabowdem!

The post How to Transform Your Unused Carport Into an Outdoor Dining Room appeared first on LiveAbode.

Designing Outdoor Kitchens with Built-Ins

$
0
0

Having an outdoor kitchen with built-in appliances is a great asset if you entertain outside regularly. It is also an investment that can enhance the value of your home. If a new outdoor kitchen is in your future, read on for tips to help you jump start the design process.

Consult the Experts

First and foremost, consider working with a professional designer or architect that specializes in outdoor kitchens. They can help you navigate the process for potential building permits, gas line installation and electrical needs. They can also help you determine the best location for your built-in kitchen so guests aren’t “in the line of fire” from cooking fumes and smoke from the grill.

LiveAbode - Hestan Built in

Choose Appliances First

The size of your cooking equipment will impact the overall design of your outdoor kitchen. For instance, built-in grills typically come in 30, 36 or 42-inch sizes. “We’re finding that homeowners are maximizing the size of their outdoor spaces and grills,” explains Basil Larkin, Vice President of Sales for Hestan Outdoor. “Expanded grill areas allow the homeowner to host larger events with more room for cooking and entertaining.”

In addition to a built-in grill, consider some additional appliances as well. Gas burners are great to incorporate for cooking stews, sauces, sautéed dishes and fish boils. Refrigeration units are a must and can include wine storage and ice-makers, while built-in beverage dispensers can provide tap beer on demand. Trash receptacles, storage cabinets and drawers are useful additions to consider as well.

You will also want think about an open work space near appliances for prepping and serving food. Some of the most durable surfaces for outdoor use include stainless steel, exterior grade tile and sintered stone products, which are resistant to UV rays and can withstand harsh climates.

LiveAbode_Hestan Side Burner

Consider an Island

If you want to save time in the design and build-out process, you may want to consider a ready-to-go island such as the Outdoor Living Suites by Hestan Outdoor. The stainless units have multiple cut-outs for appliances, pre-wired electrical and options for a stainless countertop and full-length raised bar.

LiveAbode_Stainless Outdoor Living Suite Hestan

Add a Cover

Don’t forget to include a cover for your outdoor kitchen. Not only does it create a more intimate space for entertaining, but it also provides protection against the weather.

Keep in mind that it is not recommended to operate a grill under a wood deck or other flammable material unless a hood and ventilation system is installed. For this reason an aluminum pergola, which is inflammable, would be a good choice. Some even have adjustable louvers that can be opened to let heat and moisture evacuate. For more pergola design ideas, view this article.

LiveAbode_Hestan patio and grill


Post by Hestan Outdoor, a premium appliance manufacturer specializing in high-end stainless steel residential grilling systems and complimentary outdoor products. 

The post Designing Outdoor Kitchens with Built-Ins appeared first on LiveAbode.

DIY Tabletop S’mores Centerpieces

$
0
0

Come fall, we love the thought of huddling around a campfire making S’mores with friends and family. Unfortunately we don’t always have access to large fire pits to make sticky campfire snacks.

With a few empty flower pots and a little creativity, you can create your own campfire-like ambiance in any small outdoor space. These tabletop roasters can even double as lit centerpieces for an intimate outdoor dinner!

Materials for a simple S’mores night:

  • Empty flower pots or mini terra cotta pots – 10″ is recommended
  • Chafing fuel (such as a Sterno Can) or Tin foil
  • Small river rocks to fill the pot (if you don’t have rocks or chafing fuel, line the pot with tin foil and add charcoal)
  • A lighter

LiveAbove-Smores-MATERIALS2

S’mores Ingredients:

  • Chocolate Bar
  • Marshmallows
  • Graham Crackers or Apples
  • Caramel
  • Metal or wood roasting sticks

LiveAbove-Smores-MATERIALS1

Step one:

Line up the pot(s) up as a centerpiece on your outdoor table.

Step two:

Add rocks along the bottom of each pot and place the chafing can on top of the rocks so it sits just higher than the top of the pot. Fill around the can with rocks until they all line up with the rim of the pots.

Alternative: Place a large ball of tin foil at the bottom of the pot. Line the top of the pot forming a bowl with 2 pieces of tin foil and add the charcoal.

Step three:

Light the charcoal – be careful it gets hot fast!

LiveAbove-Smores-STEP3

Step four:

Heat the end of your roasting stick to clean it. Then, push a marshmallow onto the end of the stick carefully and roast it until lightly brown on the outside and gooey on the inside. Finally, sandwich between a small bar of chocolate and two graham crackers and enjoy!

For a fun twist, use an apple in place of the graham cracker and drizzle caramel on top!

LiveAbove-Smores-STEP4


The post DIY Tabletop S’mores Centerpieces appeared first on LiveAbode.

Viewing all 14 articles
Browse latest View live


Latest Images